How to Use Display Settings Plus
0: Preface
This software only works if you are utilizing the X11 display manager. This blog post explains how to become well-rounded in the software but most Linux users will be able to use it out of the box and hover over any button to get a quick description to slowly come to understand how it works. Otherwise, comparisons against alternative programs such as ARandR and source code can be found on the GitHub page.
Also before this begins, it’s important to understand that there are two levels of current settings. The first would be the settings that are currently applied, and the other would be the current custom which are settings that are currently sitting inside the fields (whether they are applied or not).
1: Introduction
This blog will explain how to utilize the open-source display settings tool called “Display Settings Plus” to its full potential. First, I will walk you through how to download the software, then follow that up by explaining what each individual button does so you can use the software better than its creator.
2: How to Download
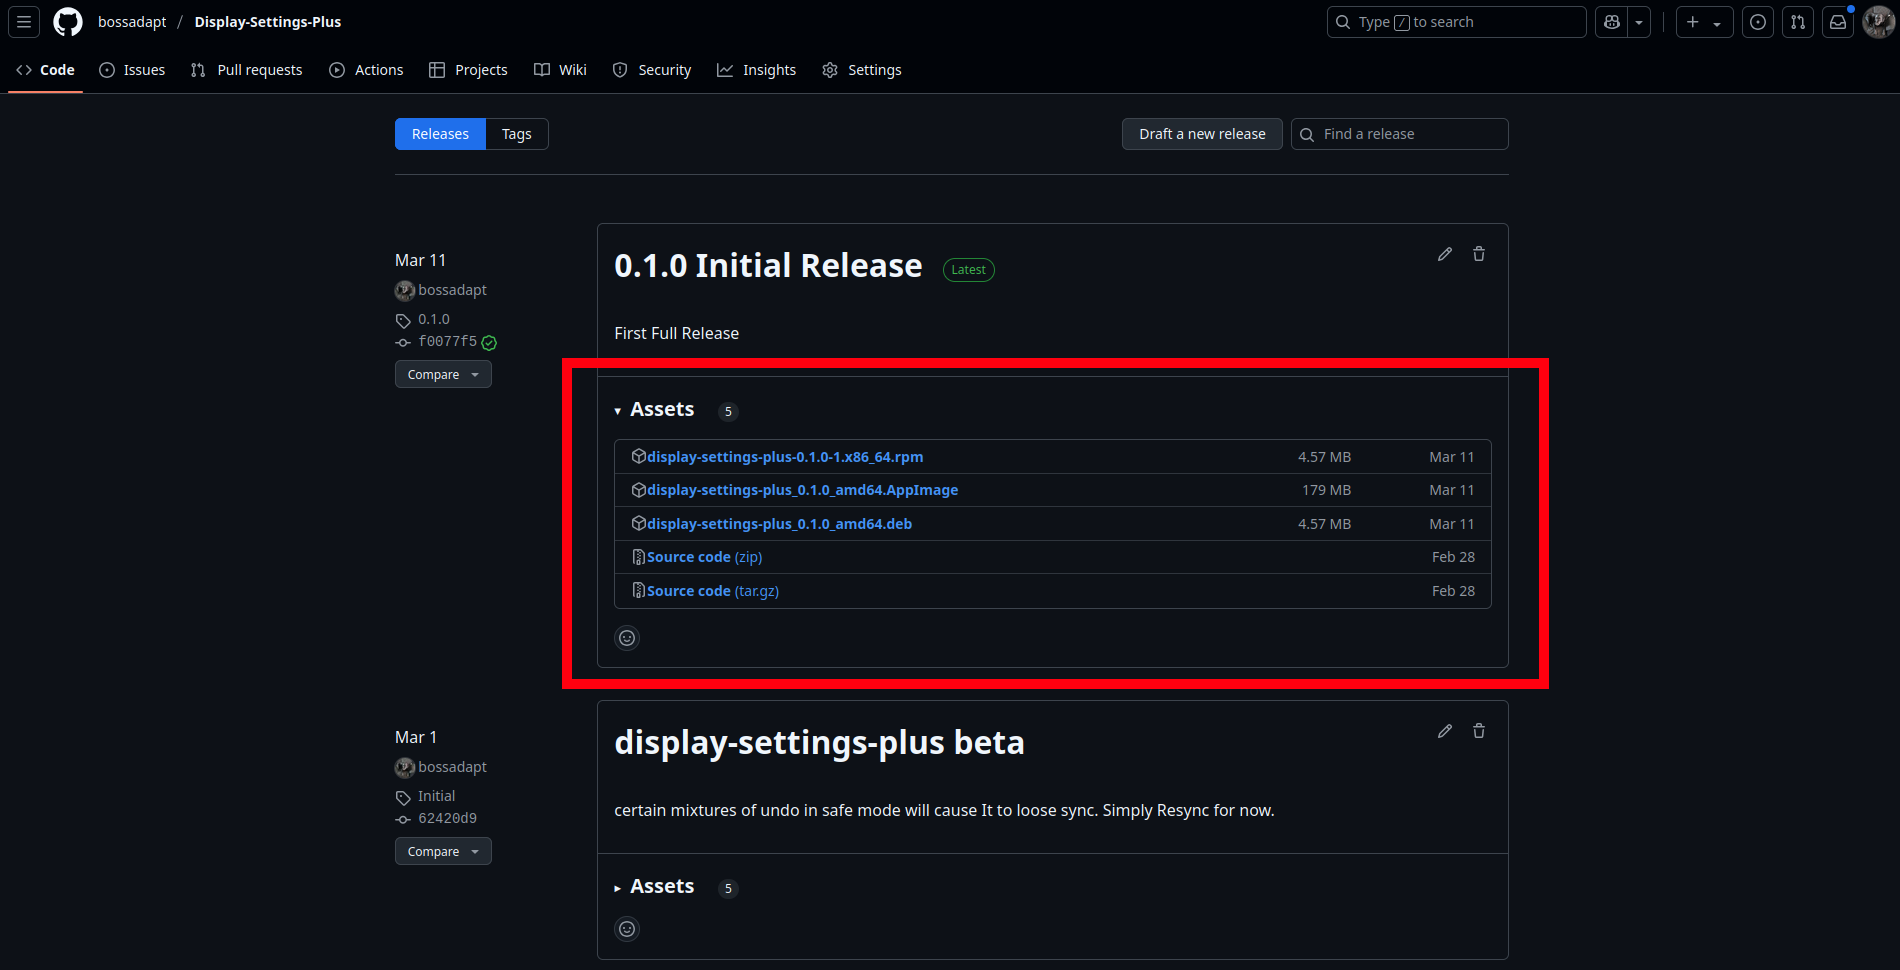 To download the software, head to the releases page. After visiting the page, choose your preferable download type found under the assets tab of the most recent release, as seen above. If you are unsure which one would be the right choice, check the table below and see which one relates most to you.
| Download Type | Who It’s For (not comprehensive) |
|---|---|
| .rpm | Red Hat, Fedora, CentOS, OpenSUSE, OpenMandriva, Oracle Linux, and some other Linux distributions |
| .AppImage | Debian, Ubuntu, Fedora, openSUSE, Linux Mint, and more Linux distributions |
| .deb | Debian distributions |
| zip / tar.gz | Those who wish to unzip / tar -xvzf the source code and compile their own Tauri application |
3: How to Use
Now to jump into how this software functions and how it should be used. To explain properly I will divide the app into 5 individual sections which then get cut into even tinier bite-sized information for you to consume. Also don’t worry if it doesn’t click the first time you read it because you will likely understand after reading a more closely related section further in.
3.1: Focused Monitor Settings
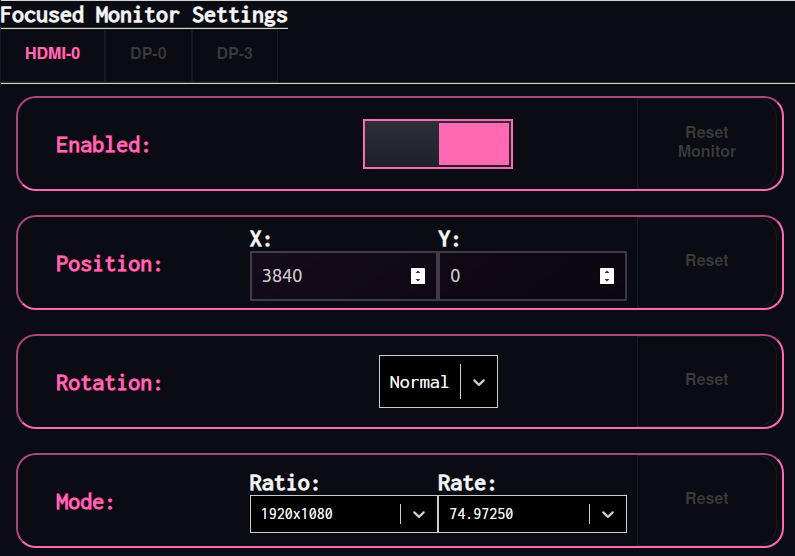
The focused monitor section is the core of editing custom settings. This is the place to go when you want to correct a specific monitor’s position by the pixel or adjust other attributes not covered by the freehand section, such as whether it’s enabled, what rotation it’s in, and what mode the monitor is in. Lets talk about each portion in more detail.
3.1.1: Focused Monitor

This portion allows the user to left-click to select which connected monitor the following settings will affect/view. The highlighted bright pink indicates it has been selected or is being hovered over, while the grey indicates it is not in focus. The name is based on the physical port each monitor is plugged into.
3.1.2: Enable

The enable section features a toggle switch and a Reset Monitor button.
The toggle button will disable all of the other setting options if switched to the left. This is because it will tell the computer not to use the monitor when applied, and it will revert back to the monitor’s factory default settings after it gets re-enabled.
The Reset Monitor Button resets all (rotation, position and mode) of the focused monitor’s settings to what the software believes is the active current settings applied.
3.1.3: Position
 The position section is pretty straightforward. This portion is a little redundant given the freehand position, but allows the user to achieve finer-grain control. Updating either the X or Y value will change the monitor’s position in real time inside the freehand position section.
Some important information about positions:
- A monitor’s position is based on the very top-left of the monitor.
- The Y-axis is reversed, and increasing the Y will lower the monitor.
- Positions will be normalized when applied to ensure the farthest left monitor starts at X:0 and the highest monitor is Y:0 and offset all other positions to keep their relational offsets from each other
- Overlapping monitors (i.e., setting the same position) is how you mirror a monitor but can be hard to see in freehand positions.
The reset button in this section only resets the X and Y of the focused monitor to what the software believes is the current applied settings (what they were after the last apply or what they were in the last state synced/pulled from the driver).
3.1.4: Rotation
 The Rotation dropdown provides four rotation options to select after clicking it. Notably, no matter which option you choose, the furthest top-left spot remains the referenced spot for its position. Also how the rotation affects the monitor is best understood by looking at the freehand position section. However, here is a quick explanation:
- Normal – the default rotation;
- Left – the default top now faces left;
- Inverted – the default top now faces downward;
- Right – the default top now faces right;
The reset button in this section only resets the rotation of the focused monitor to its last applied or last synced state.
3.1.5: Mode
 The Mode section includes a Ratio dropdown, a Rate dropdown, and a Reset button.
The Ratio dropdown allows you to choose the resolution based on what the monitor/driver says it can handle. Note that the ratio essentially resizes the monitor virtually, so a perfect mirror requires monitors to have the same ratio to fully overlap. Resizing down essentially makes multiple pixels act as one, which reduces resolution (fewer dots to make pictures = more blurriness).
The Rate dropdown lets the user choose the refresh rate (in hertz). Provided options depend on the monitor’s capabilities for the selected Ratio. Changing the Ratio resets the Rate to a default and must be manually corrected.
The reset button resets the Ratio and Rate to the last applied or last synced values.
3.2: Freehand Position
 This is the bread and butter that lets you see the current state of customized settings in action and edit their positions. So let’s dive into it.
3.2.1 Freehand Canvas
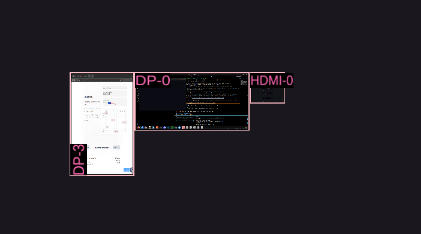
In this section, you should notice your monitor(s) in their current custom settings version of their position, rotation, and size (ratio). Each monitor displays a screenshot of what was on the screen when the application started, and the name corresponding to the physical port used. You can left-click to drag monitors or right-click to pan the scene.
Dragging then dropping causes monitors to snap to nearby ones when released to avoid gaps. Snapping connects one of the following points of the dropped monitor to the closest point on other monitors:
- top-left
- top-middle
- top-right
- middle-left
- middle-right
- bottom-left
- bottom-middle
- bottom-right
3.2.2 Freehand Settings
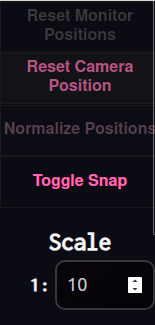
We’ll quickly go through what these buttons and the single text field do:
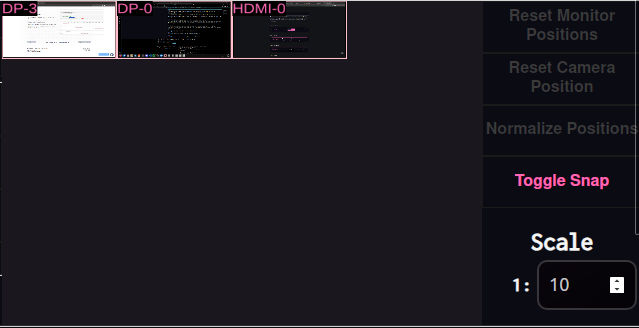
- Reset Monitor Positions: Resets all monitors’ X and Y values to the last applied or synced state.
- Reset Camera Position: Re-pans the canvas so the top-left starts at X:0, Y:0.
- Normalize Positions: Ensures the leftmost monitor starts at X:0 and the topmost at Y:0, offsetting others accordingly.
- Toggle Snap: Toggles whether or not it will snap when a monitor is dropped. Noticably it is active when it’s hot pink.
- Scale: Controls the ratio of real monitors’ size inside the canvas to reduce excessive panning (e.g., 1:10 makes a 100x100 monitor 10x10 pixels).
3.3: Presets Menu
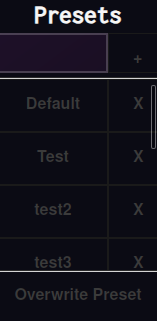
We’ve finally gotten through most of the editing features and now we figure out how to save our creations. This section is cut into three separate pieces by two bright white lines:
-
Top Piece: Contains the “Presets” title, a text input, and a “+” button. The input field is dual-purpose:
- Filters existing presets as you type (leave empty to show all)
- If you press “+”, the text becomes the name of a new preset
-
Middle Piece: Contains your saved presets which will be empty at first. Each preset appears as two buttons:
- Clicking the name makes the button highlight pink indicating you’ve selected it and overwrites the current custom setting with it stored settings (if non-empty)
- Clicking the X deletes it
-
Bottom Piece: The simplest and arguably most important. Clicking “Overwrite” while a preset is selected saves (overwrites if the preset was not empty) the current settings to that preset’s JSON file for later use.
3.4: Mass Buttons

Left to right:
- Reset: Sets all unapplied settings back to the last applied or synced state.
- Resync: Pulls current monitor settings directly from the driver, overwrites unapplied settings, and resets the state. Useful if settings aren’t applying or another tool altered the computer’s applied state.
- Clipboard: Copies the current custom settings as a simple shell script directly to the user’s clipboard. Useful for applying at startup. Example of output:
xrandr --output HDMI-0 --off --output DP-0 --mode 1920x1080 --rate 60 --pos 1920x0 --rotate normal ... - Mass Apply: Applies all settings at once, with a fallback option to revert in case of regrets. Recommended for consistent application.
- Modular Apply: Applies each change one at a time with an option to undo certain parts. This is experimental and may cause inconsistent results and may appear erratic while applying each portion due to the interdependence of the setting to look right.
3.5: Primary Monitor Section

This section includes a monitor name dropdown, a reset button, and an apply button:
- Monitor Dropdown: Lets the user select the primary monitor. The primary monitor is where apps will open by default and where the taskbar will appear (if not shown on all monitors).
- Reset Button: Resets the primary monitor to the last applied or synced value.
- Apply Button: Makes the selected monitor the system’s new primary monitor.